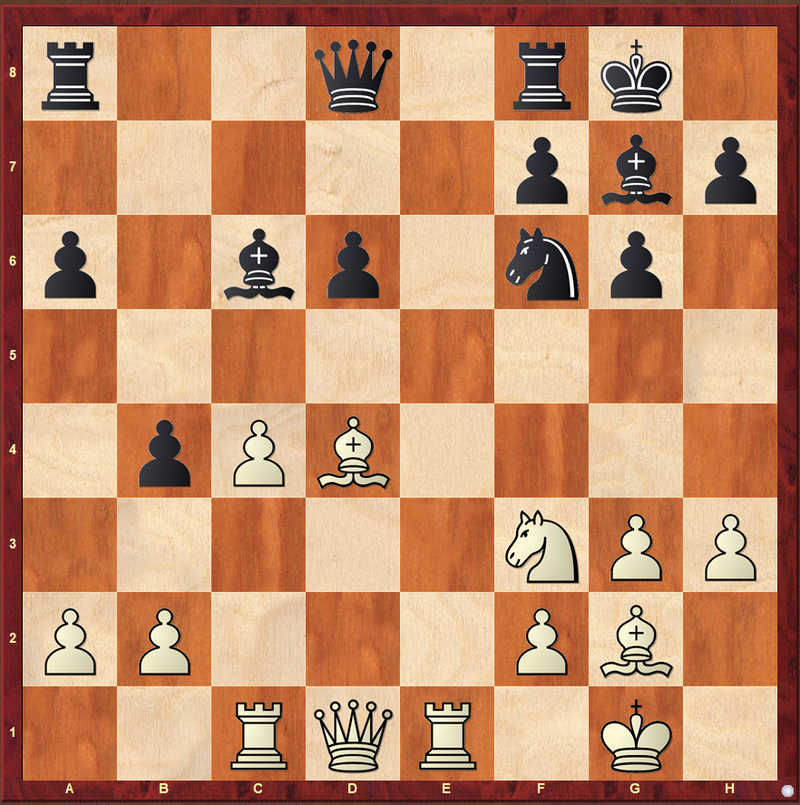
Decision Making : Should White Play c5 Here?
Should White Play c5 Here? In this position, it is White to move Would you play c5 here? Before reading further, I recommend you pause for a few minutes and think. Try to understand what the position is really asking for.
Should White Play c5 Here?
In this position, it is White to move
Would you play c5 here?
Before reading further, I recommend you pause for a few minutes and think.
Try to understand what the position is really asking for.
What Happened in the Game
In the game, White chose to play:
17\. c5
At first glance, this move looks logical.
The idea behind c5 is clear:
- Exchange pawns
- Open the c-file
- Create activity for the rook and Bishop
However, I felt that this decision was not the best choice in this position.
Let’s understand why.
The Hidden Positional Detail
The key point lies in Black’s d6 pawn.
In this position:
- The pawn on d6 is an isolated pawn
- It is not protected by any other pawn
- This makes it a long-term weakness in Black’s position
This pawn should be attacked, not released.
Why c5 Helps Black
By playing 17\. c5, White allows Black to:
- Exchange pawns
- Remove the isolated d6 pawn
- Relieve pressure from a weakness
In other words, White is helping Black solve a positional problem.
Exchanging your opponent’s weakness is often a strategic mistake.
A Better Plan for White
 Instead of c5, White can slowly increase pressure on the d6 pawn:
- Qd2 – connecting pieces and eyeing the d6 square
- Rook to d1 – placing a rook directly behind the weakness
- b3 followed by Bb2 – improving the bishop and adding more pressure
With this setup, White can:
- Fix the weakness
- Force Black into passive defence
- Improve all pieces step by step
Key Positional Lesson
When your opponent has a long-term weakness,
your job is to attack it — not to exchange it.
Patience is often rewarded in such positions.
Thanks for reading.
Please share your thoughts in the comments—would you have played c5, or preferred a slower buildup against the d6 pawn?
You may also like
 CM Barath2000
Lou Gehrig – The Man Who Never Gave Up
Lou Gehrig was one of the greatest baseball players in history. But what made him truly special was … CM Barath2000
Opening Error
An Important Opening Detail You Should Not Miss I know this is still very early in the game—we are t… CM Barath2000