
How to blog on Lichess
... learn by expressing
Table of Contents
Intro
As we head into the holidays, I was considering which features of Lichess I should be highlighting in this post. And as this is likely my last post of the year, what better subject than blogging itself?
Lichess blogging is powerful, under-documented, and surprisingly unforgiving. This post covers both the mechanics and how to reach your audience.
Creating a new post
First things first: how does one write a blog post on Lichess? Surprisingly, it's not that intuitive:
- Open the Community main menu section
- Click on Blog (near the end of the section) - this will take you to the most recent posts
- Click on My blog (left side, at the bottom) - this will take you to your posts, if any
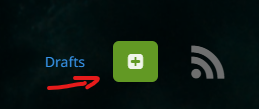
- Click on the green plus button which has no text label (top-right)
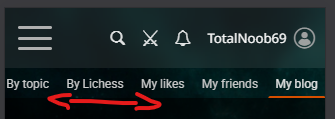
And just in case you're a masochist and decided to blog from a small screen mobile device, the section "My blog" is on top, after you scroll to the very right:
When you click on the button you are taken to the blog post editor page. Here you get:
- a Title input
- an Intro input - which is more like a subtitle, actually, don't know what they called it Intro
- the body editor (what I am using now to write this) with some tools like:
- paragraph style - headings are being set here!
- image insert
- link tool
- text style and other things
- a list of topics (a maximum of 5 can be chosen from a list)
- a "Save draft" button
Here we find the first gotcha of the blog: the preview of the content you see in this editor is NOT what you will actually see when you save the blog post. It's more a suggestion of what you might get. For example one can copy bits of a web page in this editor, it looks great, then you save it and all that is gone. Always check what the final output is. I mean, this should be obvious, but many people write something and never read it afterwards, especially after they are editing an existing post.
Writing a blog post consists of two distinct phases: the draft and the finalization. In the latter, you get extra options like:
- the blog post main image
- the declared language of the post
- if you enable comments or not
- if it's a public post or a private (draft) one
Here you also get a Preview button (top-right) which actually shows you how the post will be rendered in the end, without you having to publish it. This button should help smooth the differences between the editor and the end result, however it has a big problem: it only shows what you have previously submitted, not the current content of the blog, which makes it pretty useless. Worse, as it shows you an old version of the content, it is misleading.
Tips and Tricks
There are many less obvious tricks that you can use to help you write your blog post. I don't want to dwell too much on this, so here is a short list.
Submit your draft early
As I was saying, there are two phases of blog writing, but you can easily write your post in the second phase only. And, because at that point your blog post exists in the database, you can make sure you don't lose your work. As long as you don't check the "Publish on your blog" toggle, your post will remain in draft and you can Submit as often as you'd like. This helps with accidental refreshes or power outages or any other kind of accident. So just write a title, a subtitle and a few lines and Submit. Then submit the post often after changes and re-edit it. More on this later.
Pasting with/without style
If you copy the text from a web page, for example, it is copied as HTML, containing information about the page elements and their style. When you paste it in the blog post, some of that style gets pasted, too, with really inconsistent results.
The trick is to either right click and choose "Paste as plain text" from the menu or use the keyboard shortcut Ctrl-Shift-V. This has become quite a common shortcut in many software apps and operating systems, so it's good to remember it.
Images
Images can be pasted directly in the blog post and most of the time that's all you need. However, once pasted you can't really update the image in any way. You can resize a pasted image, but that's about it. For small images grabbed from the screen like the Preview button image I used above, that's perfectly fine. However, for important detailed images, I recommend you use the image insert button that also allows adding a description. That makes your image more accessible as well as add clarity on what you wanted to express with that image. I just tested the image insert tool and the description is completely ignored in the end, so yeah, just paste the image, it's the same thing.
Also, there is a limit of 10 images per blog post. Sometimes that's annoying, but also it might be a sign that you're trying to say too many things in one go.
The post image
The main image of the post shows in one look what your post is supposed to say. Because it is supposed to have a fixed aspect ratio (width relative to height) you are often forced to upload a larger image than what you want to show so that you can crop the image and still capture what you wanted. Just remember these dimensions and always save your image with them so you never need to worry about the cropping: 880 x 550, a width that is 1.6 times larger than the height.
There is another trick you can use. With an image editor, like Paint.net or anything else, you can enlarge the canvas so that the image you have (which may be square for example) now has a transparent extra space on the left or right - you need to save it as a PNG or other formats that support transparency.
Markdown does not work in blogs
If you are the kind of person who writes content a lot, you might be used with some shortcuts, like using ` to enclose text as code or use _underlines_ or **asterisks** to style text to bold or italic. After all, those work fine with the forum posts. The blog editor does not support Markdown. It's a completely different system.
Links
You can copy a URL in a blog post and it will be automatically detected as a link and rendered as such in the final product, however there is a nicer way of doing it, as you might have noticed in this post already, and that entails selecting a piece of text that you want to make a link and press the link button in the editor. This way the text is readable, but also contains links to external resources. Something like this: Lichess.
Also note that, just like with images, once you've created a link you can't "edit" it. Even if you select the same text again and you press the link button, you will not get the original URL to edit.
Whitespaces
Submitting the blog post content does multiple operations, including changing white space. You might want to add extra space between paragraphs by adding empty lines, but some will be removed automatically.
Embedding
The definitive guide for writing blog posts on Lichess seems to be How to write great blog posts, which includes the things that Lichess will automatically interpret as embedded content. No need for me to list again all of those things.
But there are some things that are not listed there. For example, sometimes YouTube URLs are being misinterpreted, showing an invalid embedded video for the link of a channel. Other times you want to add a link to a study, not the study itself, but if you paste the link directly you will get an automatic embed. The solution for this is to use the link button as explained above: select some text and then transform it into a link. This will guarantee that it's not being translated into something else.
You can also link to lines without having to create a study. A link like this: https://lichess.org/analysis/pgn/1.e4+c5+2.a3+d5+3.e5+Nc6+4.f4+e6+5.Nf3+b6+6.d4+a5+7.Bb5+Bd7+8.Qe2+Nge7+9.c3+g6%20?color=black#9 for example can take one to the Analysis Board, at a specific move and with a specific orientation. Even more complicated links are possible.
How to reach people
I tend to get bogged down in technicalities. I thank you if you got to this part, which is what I actually wanted to talk about most. On the other hand, if you can't read a blog post to the end, you probably shouldn't write one, so all good :)
Note the line I wrote above. It's a logical expression of my thoughts, but it probably rubbed you the wrong way, even if you did reach this point. That's because the tone is condescendent and it did not take into consideration the feelings of the reader. After many experiments I figured out that mean spirited or nasty writing doesn't get likes, even if perfectly truthful or informative or appropriate to the situation.
This is the golden rule of writing: care about your audience. Don't patronize, don't force, don't push. It's like that saying "happy wife, happy life". And just like with a beloved partner, don't go into the other direction and glaze and pander to their ego, either. If you care about honesty AND the feelings of your readers, you'll do good. It's perfectly fine to want to vent some emotion of your own, but then consider the way it will be received and how it will make others feel and see if that is your end goal.
Having covered the most important bit, let's go into the details.
Start with the image
A picture is worth a thousand words, the saying goes. Some people hate AI generated "slop" regardless of the intention behind it. Just as they don't take into consideration the effort required to locate or even draw a poster image for a blog post, you might not take into consideration how they feel about generated images. If you spent at least half an hour to write the text for the post, surely you can spend a little time to pick an appropriate image. Remember the 1.6 ratio thing I mentioned above, too.
Choose the title and subtitle carefully
The first things people see when they come in contact with your post are the poster image and the title. Once they open the post they will also see the subtitle or intro. People who opened the post because you baited them in won't like your post and those who thought you were going to talk about something else will hate it. Be clear and concise. Feel free to express everything you want in the post, but the titles should always be descriptive.
Use headings
The "Use heading" text above is Heading 4. The "How to reach people" section title is Heading 2. Do split your content into digestible bits. Readers are going to thank you. They will be able to skip the things they don't care about, but focus on the things they do.
A table of contents might be overkill, but for large posts it's a good idea. Headings generate hashes that can be used to go to a specific section of your post via a link URL, so you can easily create one. Once the post is submitted (even in draft) you can mouse over any heading and you will get a little chain icon that you can right-click to get the link to that particular section. Usually the id is generated by lowercasing all words and separating them with a minus, so you can manually write them like this: #use-headings.

Be concise or at least short
I know what you're thinking: "Total noob! You are never concise, nor short!!". To which my answer is you have no idea what the original content was like. If you have a lot to say, it's a good idea to split it into multiple posts. This also helps you structure your points and determine logical splits in your thesis.
Language
If you are not a native English speaker (or whatever language you want to write your post in), people might be put off by a poor grasp of it. My recommendation is to use ChatGPT or Grok or Gemini to get advice. Not to write the post for you, mind you. That dilutes what you want to express and annoys people. But do use things like "translate La multi ani! to English". Context is important, so you can always do something like "translate Board into French, in the context of chess", since board can mean something else in a corporate context, for example.
The way you express yourself also matters. Negative emotions might get you engagement in forums - for better or for worse - but blogs don't work like that. People spend time and effort finding blogs to read and even if they agree with you, they will not spend even more on getting outraged, insulted or self-righteous.
If you really care about how your blog will be perceived, you can also ask AI to review your entire post by pasting it and asking something like "Here is a blog post in which I wanted to clarify how to learn openings. Review it and tell me what I can improve". And then, very important, never copy paste from what it says. Just read it and make the changes yourself.
For example for this post it told me "With tighter focus, reduced redundancy, and a calmer tonal line, this could become one of the better meta-posts on the Lichess blog.". Well, screw you, ChatGPT! Everybody's a critic now.
Conclusion
I have been blogging on and off for 20 years, unless you also want to count bulletin board systems, and learning to structure my thoughts and then express them for others to process has helped me a lot to evolve as a person, understand myself and project my feelings and ideas out there. I am a weird dude, so learning this skill mattered for me. Believe me when I tell you that opening yourself to others in the right way will do wonders to your life.
Lichess is a fantastic web site for chess, but in order to truly imerse yourself in the game, you need to also express yourself and understand what others are saying inside the community. Playing the game is just half of the coin. The other is the people playing the game. Blogging is one of the best ways to learn that.
LiChess Tools improvements
...Post scriptum blurb
The browser extension I have been developing, LiChess Tools, has some features that will help you write blogs easier, as well. Here is a list of things I found useful in my writing:
- Blog editing options will give you Save and Autosave options in that second editing phase of your blog. No need to Submit and Edit, now you get a Save button as well as an auto save option so you never lose your content
- Link to current analysis will auto generate a link to the current Analysis Board content and position
- Better exported board image gives you the board image with the selected board, piece set, coordinates, shapes drawn on the board
- Blog visit history shows you which blogs you visited or liked directly from the blog post list
Happy holidays all and let's find each other well next year!
You may also like
 TotalNoob69
The world didn't end
... yet TotalNoob69
Did you know Lichess can do this?! Commands
... yes, Lichess has a command line thibault
How I started building Lichess
I get this question sometimes. How did you decide to make a chess server? The truth is, I didn't. TotalNoob69
An unexpected insight on d-pawn pushes/openings
TL;DR; Pushed d-pawns indirectly defend the second rank f square.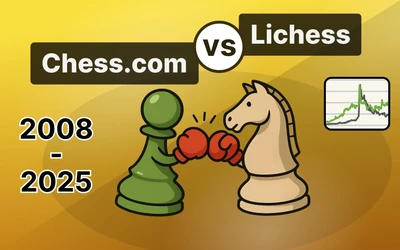 ChessMonitor_Stats
Where do Grandmasters play Chess? - Lichess vs. Chess.com
This is the first large-scale analysis of Grandmaster activity across Chess.com and Lichess from 200… CM HGabor